
Hello, Descendants! In this guide, we will explore the Module System, a key feature that allows you to enhance your Descendants and weapons.
Modules are items that were previously called Runes in the last Beta, and have been renamed to fit better in the sci-fi world of The First Descendant.
As a result, the design of the item image has been changed to resemble a chipset. Several other changes such as the way the modules are applied, module socket types, and how Capacity Cost is increased will be explained in this guide.
Contents
What is the Module System?
The Module system allows you to attach modules to Descendants and weapons to enhance their stats.
Modules can be set for each Descendant/weapon, and each module displays a list of Descendants/weapons that can use it.
Let’s begin by taking a look at how you can use modules with your Descendant.
Using Descendant Modules
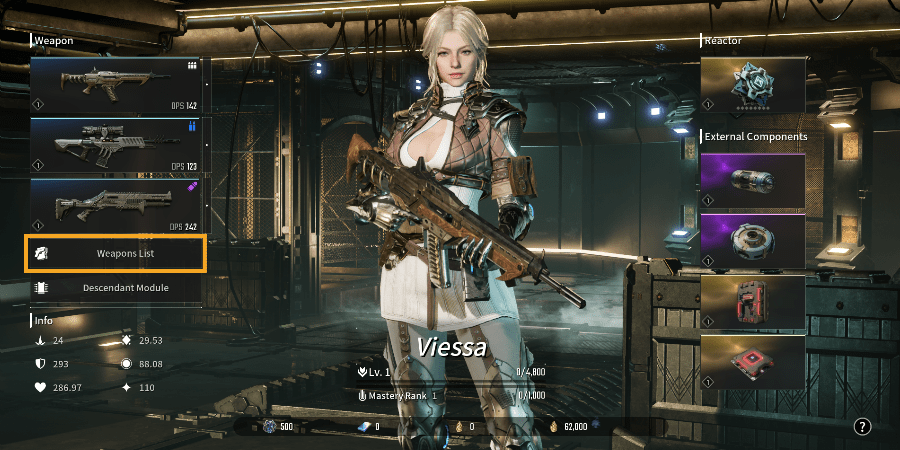
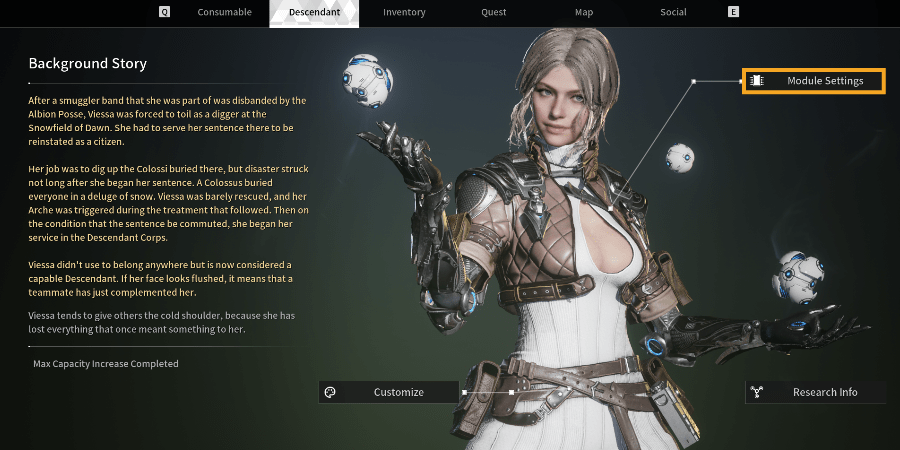
You can set modules for your current Descendant directly by pressing Inventory (I) and clicking Descendant Module on the left side.
If you want to preset modules for other Descendants that you own in addition to the one currently in use, you can do so by following the path below.
Module setting path for inactive Descendants: Descendants (H) Descendant List (G) Select a Descendant Details (P) Click Module Settings
However, please note that you can only preset modules for unused Descendants that are active. Modules cannot be preset for locked Descendants.
Module setting path for currently active Descendant – Inventory (I) Click Descendant Module on the left
Module setting path for inactive Descendants: Descendants (H) Descendant List (G) Select a Descendant Details (P) Click Module Settings
Using Weapon Modules
As mentioned earlier, you can set modules for each weapon. Hovering over the weapon you want to set modules for and pressing Module Settings (N) takes you to that weapon’s Module Settings screen.
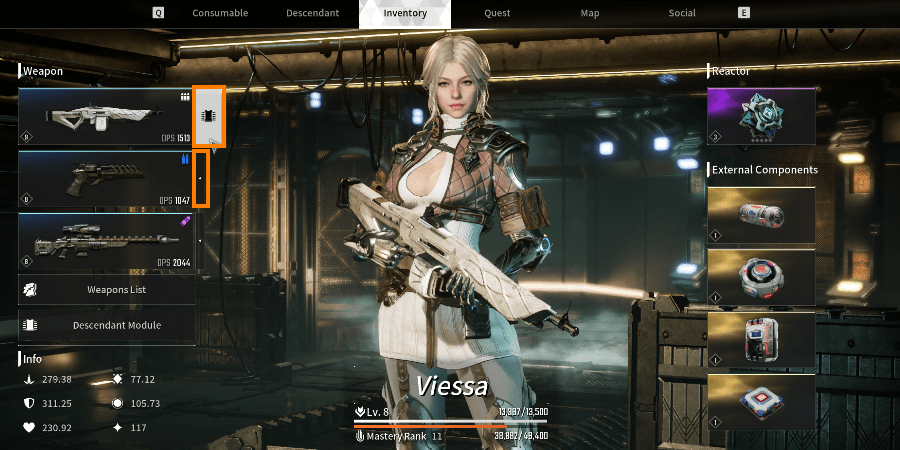
For equipped weapons, you can set modules by hovering over the ‘ㆍ’ symbol on the right side of the equipped weapon on the left side of Inventory (I), then clicking the button that takes you directly to that weapon’s module slot settings.
Hover over a weapon that needs to be set with modules and press Module Settings (N) to set modules for it
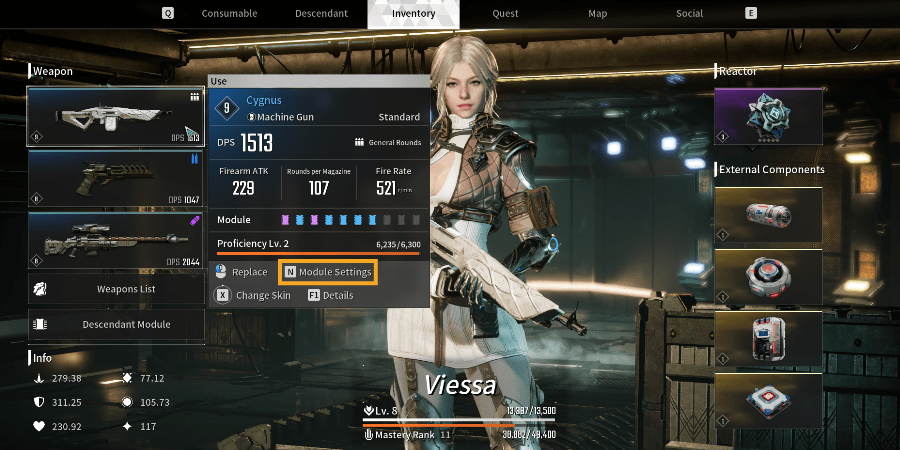
For equipped weapons, hovering over the ‘ㆍ’ symbol on the right activates a button for setting modules, and clicking it takes you to the Module Settings screen for that weapon.
Weapons with the same name will have the same modules settings applied even if they have different stats such as weapon level or DPS.
Therefore, if you preset modules for each weapon you acquire, then later acquire a high-stat weapon with the same name, you don’t have to set the modules again.
The preset modules will be applied automatically when you equip the weapon.
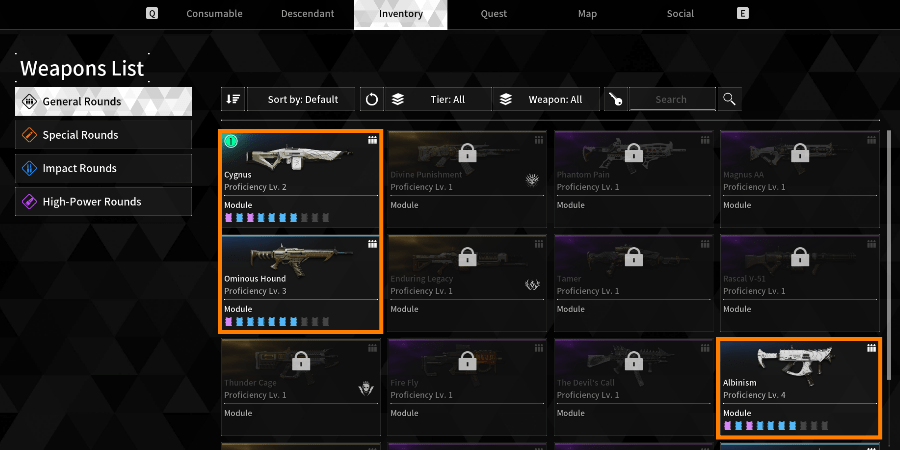
If you wish to set your modules in advance, open the Weapons List on the left side of your Inventory (I) where you can find all the weapons you’ve acquired so far are active.
Please note that you can set modules (N) for an activated weapon by hovering over it.
Opening the ‘Weapons List’ on the left side of Inventory (I) shows all the weapons you have acquired as active. You can manage module settings for activated weapons.
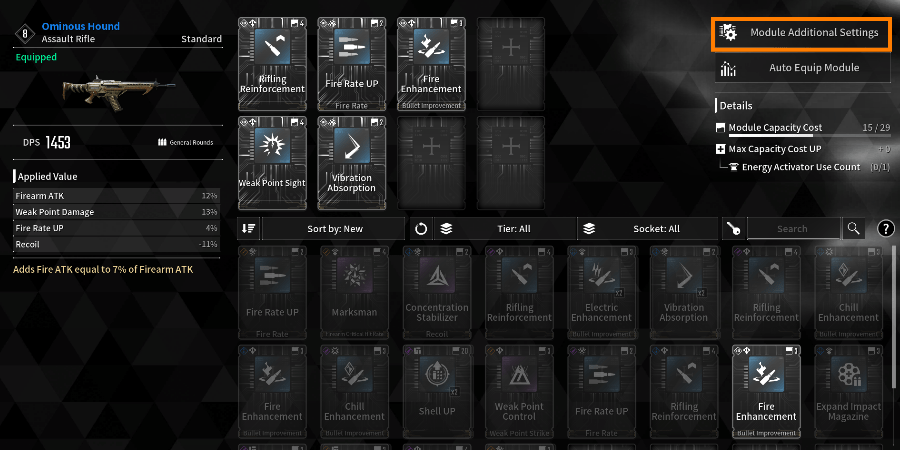
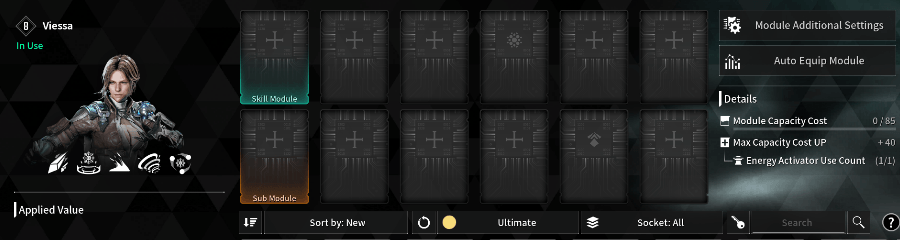
After selecting a weapon or a Descendant to set modules, as described above, you can see the Module Settings screen as shown below.
On the Module Settings screen, the information for your selected weapon or Descendant is displayed in the top left.
As a default Weapons have 6 basic slots, while Descendants have 6 slots plus 2 slots for Sub and Skill Modules, for a total of 8 slots.
Slots can be expanded through Mastery Rank Ups, which will be explained in more detail below.
Moreover, when a module is equipped, it is reflected under the Applied Values on the left, making it easy to see how the values change according to the module equipped.
Thus it is easy to try on various modules and find the best module settings for you.
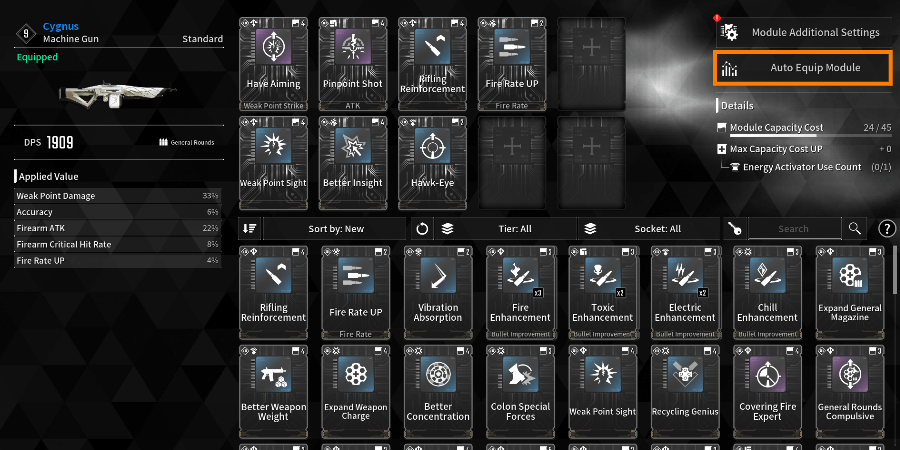
If you are unsure which modules to equip, you can use the ‘Auto Equip Modules’ feature on the right side of the Module Settings screen.
When you use this feature, modules you own will be recommended and equipped based on your Descendant and weapon classes.
Pressing the ‘Auto Equip Modules’ button shows a preview of recommended modules based on your current Max Capacity, and all previously equipped modules are unequipped.
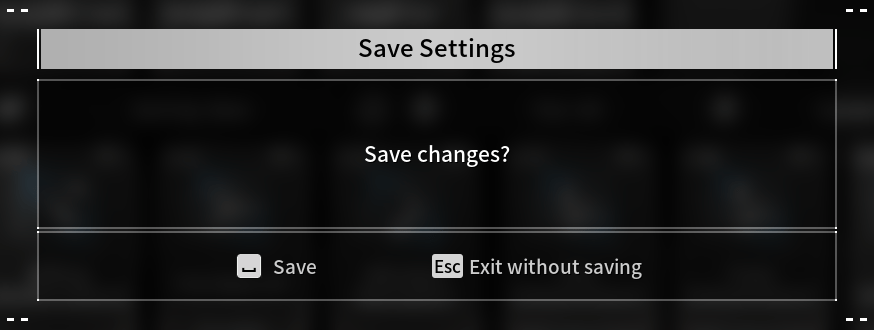
When you are done setting the modules, you must press Save (S) to save the set modules. If you leave without saving, your module settings will be reverted to your previous module settings.
If some module settings have been changed, a pop-up will appear when you leave the Module Settings screen to ask whether the settings should be saved, then you can decide whether to save or leave without saving.
Module Setting screen – On the left side, you can see the change in stats due to the modules you have set.
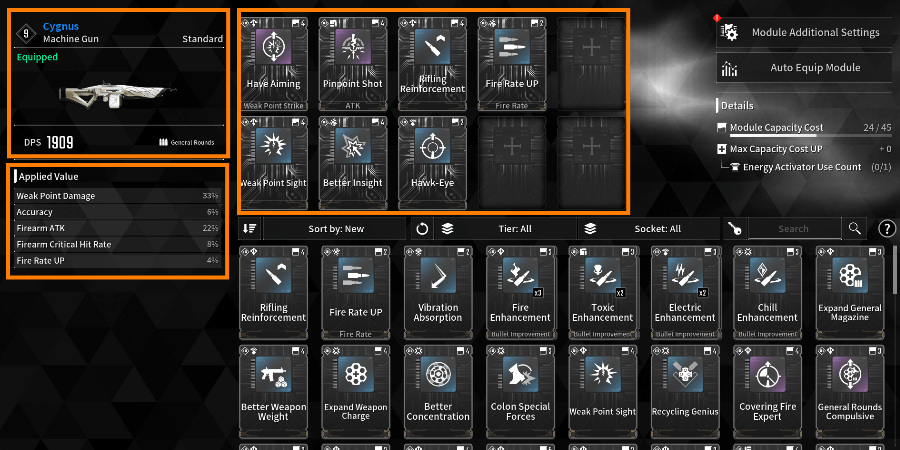
You can see how the stats change when you switch to a different module.

If you are unsure which modules to equip, try using the ‘Auto Equip Modules’ feature on the right.
To be able to set modules that suit you the best, you will need to obtain a lot of them!
You can obtain modules from mission completion rewards and killing monsters. New modules can also be obtained by combining modules.
However, you cannot equip all the modules you obtain as there are some restrictions.
- You can only equip as many modules as there are module slots
- You can only equip one module from the same group
- You can only equip as many modules as your Module Capacity allows
We will wrap up the explanation on basic module concepts here, and move on to specific module features such as combining modules, increasing the number of slots, and expanding module capacity.
Tip: Modules are set separately for each weapon and Descendant!
Module setting path for equipped weapons: Inventory (I) Hover over an equipped weapon Module Settings (N) Set modules
Module setting path for each acquired weapon: Inventory (I) Click ‘Weapons List’ on the left Hover over an active weapon Module Settings (N) Set modules
Module setting path for currently active Descendant – Inventory (I) Click ‘Descendant Module’ on the left Set modules
Module setting path for inactive Descendants: Descendants (H) Descendant List (G) Select a Descendant Details (P) Click Module Settings
Tip: When you’re done setting modules, press Save (S)!
After comparing a variety of modules and optimizing the settings, press Save (S) or the settings will not be saved.
If some module settings have been changed, a Save Settings pop-up will appear when you leave the Module Settings screen and you can decide to save the settings or not.
Leaving without saving reverts to the previous module settings, so make sure to press Save (S)!
If module settings have been changed, a Save Settings pop-up will appear when you leave the Module Settings screen. Here you can make the final decision to ‘Save’ or not.
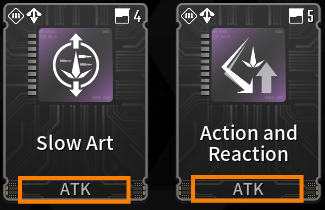
Tip: You can equip only one module from the same group!
The module group information is shown at the bottom of the module image, and for modules in the same Attack group as shown below, only one can be set even if they are different types of modules.
Dismantling and Enhancing Modules
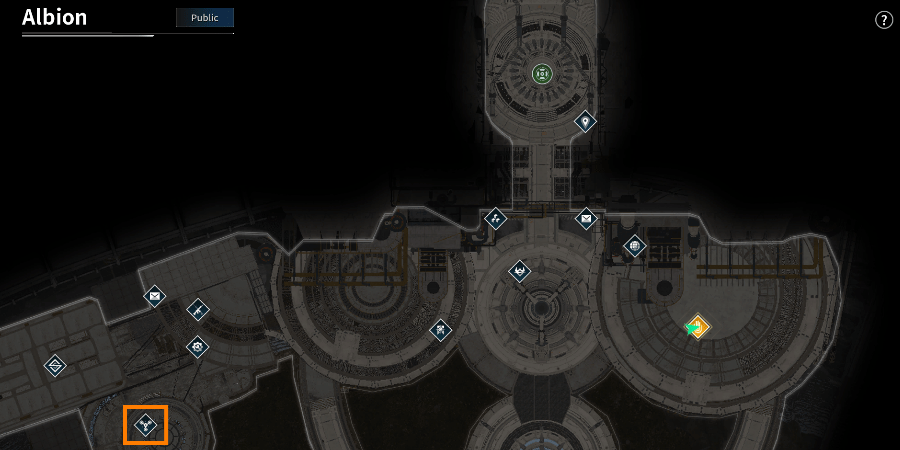
You can dismantle, enhance, and combine modules through the NPC Silion in Albion.
Modules require ‘Gold’ and ‘Kuiper Shards’ to be enhanced. They can be enhanced up to the same level as your your Mastery Rank with a maximum Enhancement Level of 10.
(Example) At Mastery Rank 3, modules can be enhanced to Lv.3
‘Kuiper Shards’ can be obtained by dismantling modules.
So, you can dismantle any duplicate or unnecessary modules to collect Kuiper Shards and then use them to enhance key modules.
You cannot fail when enhancing a module, but you can only enhance modules up to your Mastery Rank.
As the module level increases, more Gold and Kuiper Shards are needed.
Enhancing increases not only the stats but also the Capacity Cost, so make sure to check the Capacity before enhancing.
Tip: When dismantling modules, try using ‘Select Duplicate Modules’.
It is possible to dismantle modules after sorting them by your preferred sorting criteria and selecting them individually, but you can also use ‘Select Duplicate Modules’ (Shift) located at the bottom. A handy feature that allows you to select all of your duplicate modules at once.
Using Select Duplicate Modules selects all but one of the duplicate modules you currently own.
Tip: When enhancing modules, try using the ‘Show Equipped Modules Only’ feature
There is a convenient feature that allows you to see all of your equipped modules at once when you enhance a module.
When you press ‘Show Equipped Modules Only’ (L) located at the bottom of the Enhance Module screen, you will see a list of all modules that are equipped on your weapons and active Descendants.
Please note that this also shows modules that are set on unused weapons and inactive Descendants.
Tip: Checking Module Information
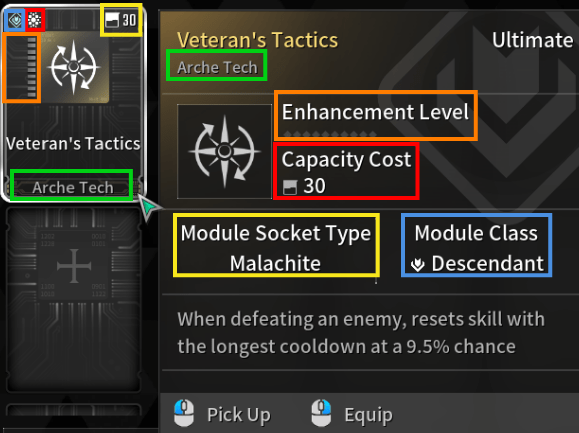
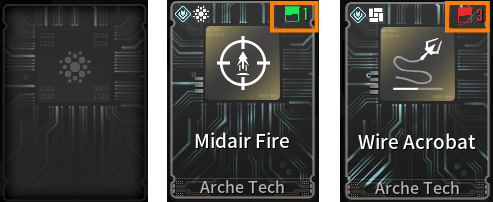
- ■ – Module group (only one module from the same group can be equipped)
- ■ – Module’s Enhancement Level (the yellow gauge on the left side of the module is filled according to the Enhancement Level)
- ■ – Capacity Cost
- ■ – Module Socket Type information
- ■ – Module class (for checking Descendants and weapon types that can equip the module)
Combining Modules
You can Combine Modules starting at Mastery Rank 5 or higher.
Combining modules requires 4 modules and a certain amount of Gold regardless of module tier or type, and has a success rate of 100%.
When combining, the resulting module can be affected by the tier, type, and socket type of modules used as materials.
Increasing Module Slots and Capacity
Increasing Module Slots
The number of module slots increases through Mastery Rank Ups.
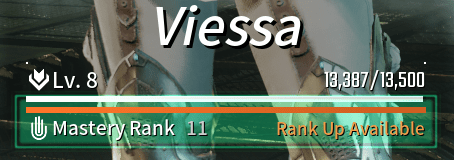
Tip: What is a Mastery Rank Up?
You receive a certain amount of Mastery EXP from leveling your Descendant, increasing your weapon’s Proficiency, completing Missions, and Quest rewards.
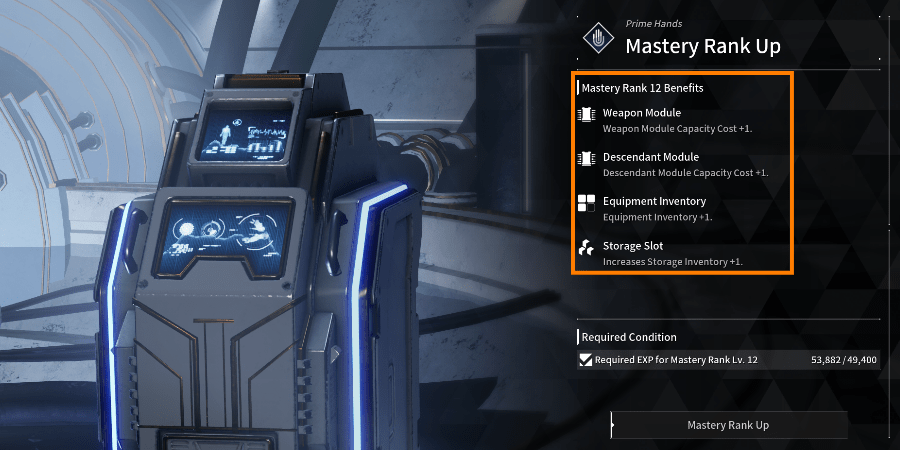
When the Mastery Rank EXP bar is full, you can perform a Mastery Rank Up through ‘Prime Hands’ in Albion.
When a Rank Up is available but you don’t take it immediately, you can still accumulate Rank Up EXP from playing the game. That means you can Rank Up at any time when you next visit Albion.
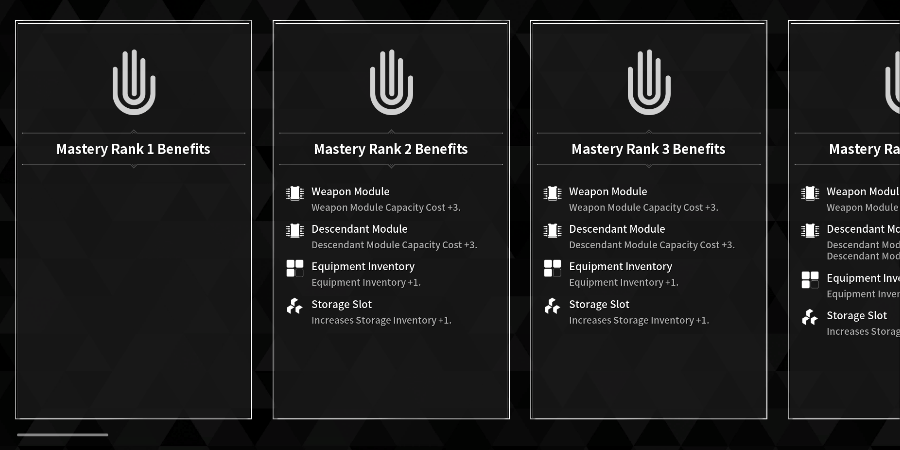
As your Mastery Rank increases, your weapon/Descendant module slots, Capacity, and Equipment Inventory/Storage slots also increase according to the increased rank.
You can see the benefits of each Mastery Rank by clicking the Mastery Rank area under Inventory (I) Descendants.
You can Rank Up when the Mastery Rank EXP bar is full. Clicking this area shows what benefits are available at each Mastery Rank.
Clicking the Mastery Rank area under Inventory (I) Descendants shows the benefits of each Mastery Rank.
Mastery Rank Up is performed at the Prime Hands in Albion, which is located on the right side of Albion.
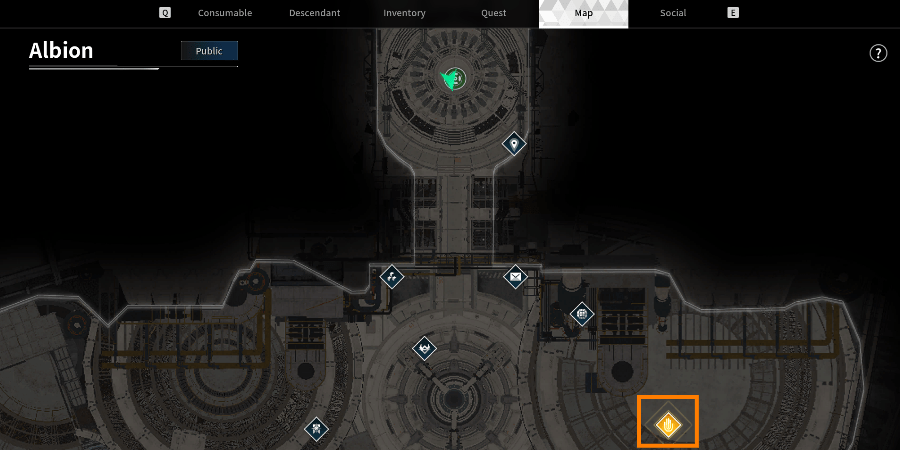
Prime Hands Mastery Rank Up screen – shows the benefits of the next Mastery Rank.
Increasing Module Capacity
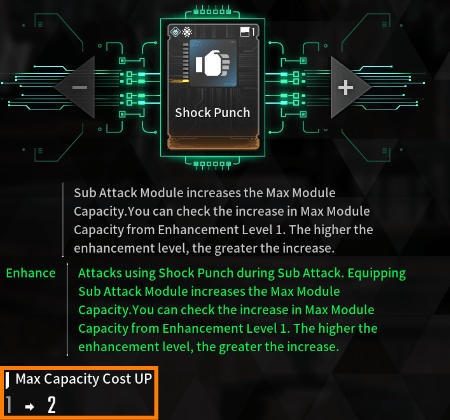
You can increase module capacity through Mastery Rank Ups and a one time increase of Max Capacity in the Module Settings.
In addition, assigning a Module Socket Type allows you to socket modules with matching Socket Types into corresponding slots at a reduced Capacity Cost for efficient utilization.
(1) Increasing Max Capacity
You can increase Max Capacity 1 time by pressing ‘Module Additional Settings Increase Max Capacity’ on the right side of the Module Settings screen for weapons and Descendants.
However, increasing Max Capacity requires ‘Energy Activators,’ which are obtained through Research Requests.
Information about Research Requests will be provided in the next guide.
On the right side of the Module Settings screen, go to Module Additional Settings Increase Max Capacity and use Energy Activators to increase Max Capacity 1 time
(2) What are Module Socket Types?
Assigning a Socket Type to a module slot and socketing a module that matches the slot’s Socket Type reduces the module’s Capacity Cost, which allows you to manage Capacity efficiently.
You can assign Module Socket Types at ‘Module Additional Settings Assign Module Socket Type’ on the right side of the Module Settings screen.
However, please note that socketing a module with a different Socket Type increases the Capacity Cost.
Example: When socketing a module with a Capacity Cost of 2, the actual cost is 1 if the Socket Type matches. If the Socket Type doesn’t match, the cost is 3.
Only one Socket Type is assigned to a Descendant module slots by default, and no socket type is assigned to weapon module slots.
To be able to assign module Socket Types, your Descendant must have reached the maximum level (currently 40) and weapons must have reached the maximum Proficiency level (currently 40), and you must also have ‘Crystallization Catalysts.’
After all conditions are met, assigning a module Socket Type resets the maximum level of a weapon/Descendant, and you can only assign a module Socket Type using Crystallization Catalysts again after reaching the maximum level once more.
Tip: Obtaining Energy Activators and Crystallization Catalysts
Obtained by crafting from Albion → NPC ‘Anais’ → Research Request
Upon completing a Sub Quest, you receive materials for crafting items such as blueprints for Energy Activators and Crystallization Catalysts.
You can visit NPC Anais to craft those items yourself.
Location NPC Anais in Albion
[Recap! Increasing Max Capacity]
Craft and obtain Energy Activators through Research Requests → Module Settings of a Descendant or weapon to increase Max Capacity → Module Additional Settings → Increase Max Capacity 1 time
[Recap! Assigning Module Socket Types]
Reach maximum level for a Descendant or maximum Proficiency level for a weapon. Craft and obtain Crystallization Catalysts through Research Requests → Module Settings → Module Additional Settings → Assign Module Socket Type
Introduction to Sub Modules and Skill Modules
In Descendant Module, there is one slot each for Sub and Skill Modules, and only a module of the correct kind can be equipped in each slot.
Locations of Skill and Sub Module slots on the Descendant Module screen
Sub Modules
Equipping a Sub Module allows you to perform a variety of melee action attacks depending on the module type, with improved damage and attack range over Sub Attacks without a Sub Module equipped.
Sub Modules have an initial Capacity of 0, but their Max Capacity increases with enhancements which also increase the Max Module Capacity of the Descendant equipping an enhanced Sub Module.
Equipping an enhanced Sub Module increases the Max Module Capacity of the Descendant equipping the module by the corresponding value.
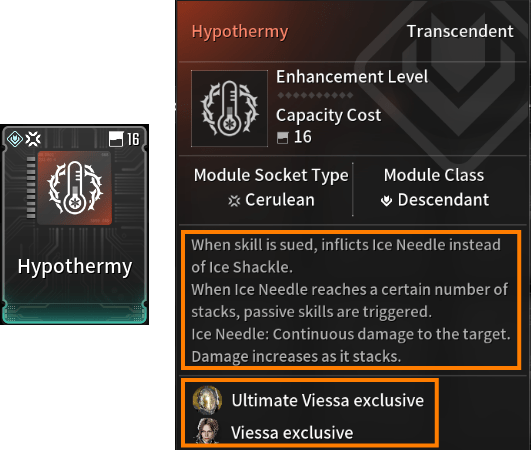
Skill Modules
Skill Modules modify the ability of Descendant skills to become even more powerful.
A Viessa exclusive Skill Module – The tooltip shows how the skill changes and which Descendant the module is for.
[Module Recap]
1) Modules are set separately for each Descendant and weapon on their respective Module Settings screens.
- Setting Modules for Descendants: Descendants (H) Descendant List (G) Select a Descendant Details (P) Click Module Settings
- For the Descendant currently in use, you can set modules directly in ‘Descendant Module’ on the left side of the Inventory (I) screen in addition to the above method!
- Setting Modules for weapons: Hover over a weapon Module Settings (N)
2) You can set Modules, change Socket Types, and increase Max Capacity on the Module Settings screen.
3) You can enhance, dismantle, and combine modules through the NPC Silion in Albion.
4) Changing Socket Types requires reaching maximum level for a Descendant and maximum Proficiency level for a weapon along with ‘Crystallization Catalysts.’
- ‘Crystallization Catalysts’ can be crafted through Research Requests.
- Changing a Socket Type resets the Descendant’s level or the weapon’s Proficiency level, and you can assign a Socket Type again using Crystallization Catalysts after reaching the maximum levels once more.
- Socketing a module that matches the Socket Type reduces the Capacity Cost.
5) You can increase Max Capacity 1 time for each Descendant and weapon, and it requires ‘Energy Activators.’
- ‘Energy Activators’ can be crafted through Research Requests.
In this guide, we’ve covered the Module System.


Be the first to comment