
This section covers all contracts and miscellaneous side quests that can be completed during the course of Crimson Veil’s main route as well as mention when and how the quest can be started.
Contents
- Contract 2: Avenge the Fallen Daughter
- Contract 3: The Scrawled Contract
- Contract 4: Dark Dreams
- Contract 5: Cleansing the Cathedral
- Contract 6: A Lesson in Botany
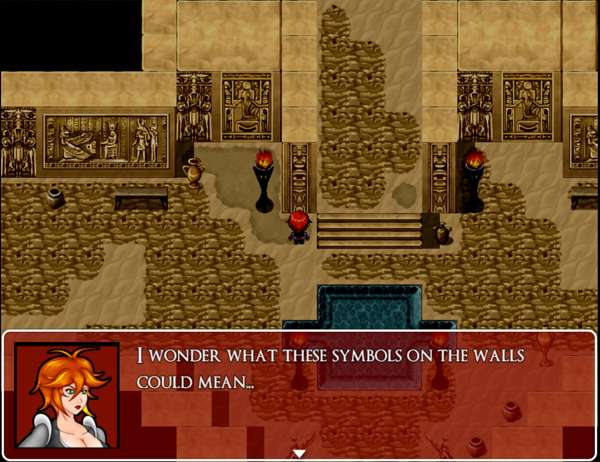
- Contract 7: The Blood Temple
- Contract 8: The Lost Wife
- Contract 9: Suspicious Snake Oil
- Contract 10: Keeping Mindful
- Contract 11: Beneath the Full Moon
- Contract 12: The Tragic Bride
- Contract 13: The Forgotten Treasure
Contract 2: Avenge the Fallen Daughter
- Availability: At the end of Chapter 2
- Recommended Hunter Level: 7
After accepting the contract, meet your client just south of the armor shop in Mor Town Center. He will tell you his daughter was bitten by a red haired vampire who fled into the mountains when she was spotted. The daughter died and her father wants revenge. Go to the Mountainside area and go to the cave with the vampire lair inside, the one with the 4 coffins. Examine the northmost coffin to find none other than Evelyn! It turns out she didn’t end up killing herself and turned instead. She was the one who killed your client’s daughter and now she is thirsty for you.
- Evelyn
- Max HP:1900
Evelyn is like a bulkier version of Iris. She trades in speed for power and can use the Axe skill and the quick Knife skill. Start the battle off by using Dagger or Liquid Silver to weaken her blows and use Fire Bomb to numb her for a turn or two. Her physical defense is much greater than her magical defense, so Fire Bomb is your best bet. If you have Brave Soul, this is a good time to use it. Once you have beaten her, Evelyn will ask you to watch over Lucy for her and will surrender. Evelyn’s soul can finally be put to rest and you will get Evelyn’s Remains. Return the remains back to your client to receive your reward of 1200 Gold and an Ammo Pouch! You will also unlock Pic 18 in your Picture Gallery.
Contract 3: The Scrawled Contract
- Availability: At the end of Chapter 2
- Recommended Hunter Level: 7
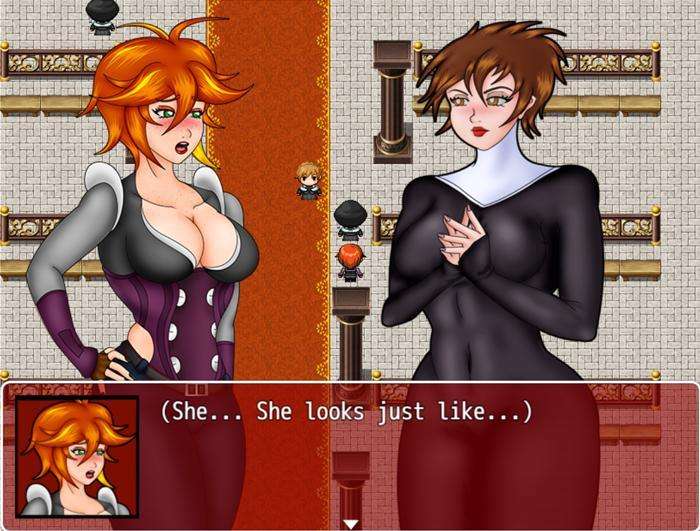
After reading through this fishy looking contract, return to the Abandoned Manor in Humilem Village. You will notice a shadowy figure towards the west side of the second floor. If you try to approach it, it will flee to the bedroom in the east. Once you enter that room, you’ll find nothing. Once you exit that room, the shadowy figure will reminisce on the state of the manor, then walk to the room across the hall. Finally enter that room to meet this mysterious character. It’s the vampire who attacked Evelyn during the events of Chapter 2. She is actually your client and she happens to be looking for a new blood thrall. Unless you want to become one, prepare for a fight.
- Karen
- Max HP:2200
Karen’s gimmick is that she often attacks using the Axe skill, which can mean you’ll likely take a lot of damage when one of her attacks hits. Thankfully, the Axe skill has an unpredictable accuracy so there will be turns where she will miss, unless you get unlucky. Use Dagger and Liquid Silver to weaken her blows if she is dealing too much damage and heal if you are at less than half of your health. Pretty straight forward.
Well, you’ve killed your client, you will unlock Pic 19 in your Picture Gallery, but all she drops is a crummy Hymn Sheet. Take that Hymn Sheet to the Humilem Church and use it to play a haunting tune on the organ. After playing the song, the curtain will reveal your true reward, an Ultimus Laurel, which raises your HP, Attack, Defense, and Agility stats by 5!
Contract 4: Dark Dreams
- Availability: At the end of Chapter 1
- Recommended Hunter Level: 4

Head to East Mor Town and go to the second floor of the Eastern Shelter. Knock on the door second from the right and open the door to meet your client, Sybille. She tells you that she fears she is being stalked by a succubus and would like your protection while she sleeps. Speak with her a second time once you are ready to begin the job.
This quest will have 2 possible endings based on how you answer the choices you are presented with. Answering either positively or negatively will influence Sybille’s “Trust” level, thus affecting the second half of this questline. If your answers are mostly negative, you will get the less desirable outcome and a lesser reward. Still, if you would like to see both outcomes, merely save before speaking with Sybille a second time.
Sybille will try and fall asleep, but will remain restless and begin speaking to you. If you attempt to inquire further, she will begin to tell you of her past, but hesitate and tell you she needs more time. If you don’t press her, the conversation will end there and her Trust will decrease. Regardless of your choice, time will pass and she will open up and reveal her troubling past to you. After their chat, Sybille will ask if she is a burden to you. Choose the appropriate answer to affect her Trust and your client will finally head to bed.
Not long after, Mila dozes off only to see a succubus looming above Sybille and draining her energy. The succubus, Aeriseth, is unbeatable at this point. You can keep attacking, but she will merely tease you for a few turns while chatting with you. She will attempt to bribe you with gold in exchange for Sybille’s soul. If you accept, it will severely impact Sybille’s Trust towards you and you will only get a mocking chuckle from the succubus in return. Eventually, Aeriseth will get bored and put you to sleep, ending the fight.
You will wake up in a nightmare world that looks just like Noctorna HQ. There is a chest here you can grab with a free Vampire Dust. Go to the east side of the building to find a creature that looks like Maria, only with a freakish looking face. She will ask you a question and you are given 5 possible answers. The topmost answer will negatively affect Sybille’s Trust the most, while the one at the bottom will affect Sybille’s Trust the most positively. After speaking with that Maria creature, walk all the way to the west half to speak with a Bridgette looking creature. Same deal here with the answers. Lastly return to the east side of the room near the tables to find a Mate looking creature and answer her question. You’ll then be transported to a different area.
There is nothing and no one in this area, you are completely alone. If you keep running in a direction, you’ll just end up back the way that you came. Keep doing that a few times and you will suddenly find yourself surrounded by those creatures who questioned us earlier for a cheap scare. Mila will flee from them and then seemingly end up back in the same spot again, only this time, Sybille is standing there, looking off into the distance. This is where her Trust level affects the second part of this quest.
If Sybille doesn’t trust you…
Speak with Sybille and you will be transported out of the dream and back into her room, but neither she nor the succubus are anywhere to be found. When you leave her room you will hear some lewd noises coming from the room next door. The door is ajar, so you take a peek to see Sybille has been turned into a succubus herself and is enjoying her first meal. Utterly corrupted, you have no choice but to defeat your former client.
- Succubus Sybille
- Max HP:1200
Sybille is a lesser succubus and has not come into her powers yet. Her attack is not very high, although she can still inflict Bleeding on you with her claw swipe and after 3 turns, she will mercilessly drain your health with her succubus powers. Defeating her will earn you the Lesser Succubus Choker as well as Pic 20 and 21 in the Picture Gallery.
If Sybille does trust you…
You will emerge from the nightmare to see that Aeriseth is still draining your client. She’s shocked to see that you’ve broken her spell and you immediately charge at her.
- Aeriseth
- Max HP: 800
Aeriseth is a similar fight to Succubus Sybille. Her stats are a bit higher, but she has less HP.Once you deal at least 800 points of damage to her, she will end the battle and disappear, saying that her interest has shifted to you instead of Sybille. Sybille wakes up and everything is fine again! The only problem is, well, Sybille can’t exactly afford your services. She’ll give a mere 50 Gold. She’s a troubled soul with plenty of issues to sort out, so we’ll just have to accept it and move on.
As you leave the Eastern Shelter, you’ll bump into a little girl. She’s startled but then leaves you, heading towards the graveyard a bit to the south. Go on and speak to her to find out she’s been orphaned and has no one to care for her now. I think we know where this cheesy story is going… You of course take the little girl back to Sybille and have her take care of the girl in the place of compensation. After the sweet little scene, Mila will be rewarded with a new skill, Selfless Soul, which restores a small amount of SP in exchange for LP. You will also unlock Pic 20 and 21 in the Picture Gallery.
Contract 5: Cleansing the Cathedral
- Availability: At the end of Chapter 2
- Recommended Hunter Level: 8
After accepting the contract, go to Besilly Cathedral and speak with the first blond nun by the entrance. She will introduce you to Sister Lily, a woman who looks strikingly similar to Iris. After a bit of PTSD flashbacks, Lily tasks you with defeating some ghouls in the Rotten Grove. As you step out of the cathedral, an injured nun stumbles toward you named Mother Clara. She’s pretty rude, but Lily comes outside to take care of her and urges you to clean up those ghouls in the Rotten Grove as soon as possible.
While on this quest, you will only be able to explore the initial area of the Rotten Grove!
3 Ghouls will spawn in this entrance area. Simply defeat all 3 and then head back to the cathedral, where the church bells have ominously stopped. Inside, Mother Clara will be waiting for you beside 2 unusually quiet nuns.She will pay you 800 Gold for your work and bark at you to leave. There is more to this Clara than meets the eye…
Return once again to the cathedral to find it completely empty. Head over to the small chapel on the right side and walk into the holy water to get Mila soaking wet. This may seem like a bit of a gag, but it has a purpose. Save and then walk to the room on the left side. Check the flowers on the table to get a small 20 Gold. Walk into either of the doors to enter Clara’s office. Inside the office is a red chest containing a rare Prism Core! Check the drawer next to it to get a Tourniquet.
Once you are in this office, you MUST read the journal on Clara’s table.You will discover that she is in fact one of Viviene’s old servants and wishes to continue her lofty goals. If you leave this office without reading the entry, it will result in an immediate bad ending. After reading this passage, leave Clara’s office to bump into Lily, who has already been turned into a vampire by Clara.
- Lily
- Max HP: 1400
This fight shouldn’t give you too much of an issue. Lily doesn’t have much in the way of surprises in the way that she fights. Her attack isn’t particularly hard and she should go down with ease. Leave Clara’s office after the fight and return to the main area of the cathedral and you will see that the nuns have all been turned into vampires. You can fight them or ignore them, but once you have defeated the boss of this area, they will be gone regardless, so keep that in mind. Proceed to the chapel on the right to face off against Clara, this quest’s boss.
- Clara
- Max HP: Form 1: 1000+
- Max HP: Form 2: 2000
Clara will start off as a rather tame battle, actually having even less attack than the corrupted nuns. During the second turn of the battle, if you fell into the holy water earlier, Clara will take an additional 350 damage at the start of the turn. Once Clara has been dealt at least 1000 damage, the battle truly begins. Clara’s actions become erratic and her attack and agility stats increase greatly. Use Brave Soul as soon as you are able to buff your defense. Even if you are at the recommended level, Clara may still outspeed you and move first. Liquid Silver can be more useful than Dagger for weakening Clara since it’s item priority makes it always go first. Fire Bombs are very ineffective against Clara with her high magical defense, so use physical skills like Axe or Knife instead.
Once she is beaten, Clara will fall into the holy water she very foolishly decided to stand near and burn in a blaze of glory. Leave the room to find a man shocked at the carnage you left behind in this holy place. He goes toward the altar to pray. Speak with the man again to receive a Felix Laurel, which raises your Luck stat by 4. You will also unlock Pic 22 in the Picture Gallery
You can also step outside to find Robert Häupel, who will give you a Salutem Laurel for chatting with him.
Contract 6: A Lesson in Botany
- Availability: At the end of Chapter 2
- Recommended Hunter Level: 10
After accepting the contract, go to Mor Town West and speak with the bearded man standing in front of the crops. He tasks you with collecting a Devil’s Ribwort, a sort of root that is harvested from Alraune that lives in the Rotten Grove. He mentions that they use mind altering pollen and gives you a Gas Mask to protect you from it’s effects. You should equip this head gear immediately. Head on over to the Rotten Grove and head east through the forest maze, north through the pond area, and up the cliff on the west end of the area with the broken bridge.
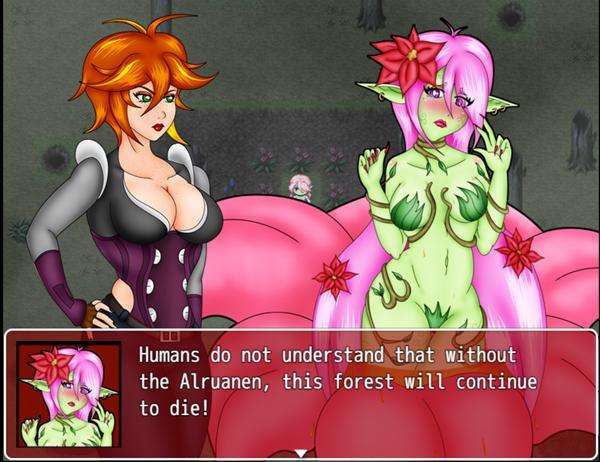
As soon as you enter this area, Mila will comment on the sweet scent in the air. Speak with Alraune standing alone in the dirt. Her name is Marina and she explains to you that vampires have been murdering her kind to steal her nectar. Mila suspects that the vampires may be using this nectar to create some sort of mind altering substance. You are presented with two options and your quest will change based on your decision.
Inquire about the vampires…
If you press Marina for information on the vampires. She thinks they are in the southeast edge of the forest. From where Marina is standing if you just go south, you can actually jump down to quickly get back to the forest maze. Once you are in the maze, enter the area leading south. In that small grotto, you will find two Corrupted Nuns chatting. Mila hides behind some trees nearby to hear their conversation, but she is quickly noticed and the two vampires will attack. Beat them to receive the Stolen Alraune Nectar.
Return to Marina and hand over the nectar you collected. In return she will give you the Devil’s Ribwort that belonged to one of her Alraune friends. Marina has a desire to restore the forest to a healthy state, however, it would be difficult without more alraune around. She has the crazy idea of turning you into one to help her repopulate the forest and expels her pollen at you.
- Marina
- Max HP: 2600
Marina starts off the fight by spreading her sapping seeds all over you. During the entire course of the fight, a bit of your health will be sapped away and restore Marina’s health. Since she is not undead, liquid silver and daggers will not weaken her. She will occasionally use her pollen to make you woozy, preventing you from taking any action. If you are unlucky, she will mesmerize Mila, making her immobile for even longer! If you equipped the Gas Mask before the fight, you will be able to resist both status ailments. Also watch for her corrupting fluid, which will weaken Mila and temporarily lower her stats. Marina has a high amount of HP and a sizable attack stat. Her biggest weakness is her low agility and weakness to fire, so use Fire Bomb as your main attack. In addition to doing damage, the Fire Bomb can occasionally numb enemies which will likely skip Marina’s next action. Packing additional Supply Caches will be useful since you will be spending a lot of SP during this fight. Defeating Marina will get you a Celeritas Laurel.
Marina seems genuinely sorry for attacking you. If you speak with her again after the fight, Mila will apologize for hurting her and Marina will give you the Alraune Headdress. Return to your client in Mor Town West and turn in the Devil’s Ribwort to receive 2000 Gold and unlock Pic 30 and 31 in your Picture Gallery.
Harvest the Alraune…
If you choose to harvest Marina for the Devil’s Ribwort instead, you will immediately have to battle her. Follow the strategy posted above if you need help. After you have defeated her, return to your client in Mor Town West and turn in the Devil’s Ribwort to receive 2000 Gold and unlock Pic 30 and 31 in your Picture Gallery.
Contract 7: The Blood Temple
- Availability: At the end of Chapter 2 and after speaking to the girl in the graveyard of Abelleth Village.
- Recommended Hunter Level: 13
After accepting the contract, head to Abelleth Village’s graveyard. You arrive too late as your client has already been taken to the Blood Temple as a sacrifice. Head to the Village Elder’s Office and a woman will bump into you as you enter. Her name is Astoria and happens to be the lover of your client, Alexa. Astoria is confident that the village’s traditional ritual is a sham and wants to enter the Blood Temple herself to try and rescue Alexa. Though the temple itself is locked, Astoria stole the key from under the leaders’ nose. She will open the place up for you and await you inside.
The Blood Temple is located in a cave at the northern end of the Rotten Grove. Go down the hole and proceed north and you will find the temple’s large stone door. Shimmering on the floor nearby is the Stone Tablet that Astoria was carrying. Use it on the door to open the way into the temple.
Go through the first hall into a room which has 4 doors and a mirror in the center. All of the rooms are locked except for the leftmost room, so enter that room first. This room looks like a sort of lobby with large desks, a piano, and a suit of armor with a pool of blood on the floor and on the wall by it. Your attention should be drawn to the shimmering object on the table to the right. Examine it to pick up a Small Key. You can use this key to unlock any of the other 3 locked doors in the room before this. The last thing to mention in this room is the scattered notes on the centermost table. It will mention a trap that has been laid downstairs. Make a mental note of this.
Before we use that small key we just got, let’s go get the other 2 so we can open each door without having to backtrack. From the main room with 4 doors, head west into a hallway with a long dining table and stairs leading downstairs. Ignore the stairs for now and go north through the hall and take a right to go into the next room. It will appear as if you are outside, even though you are underground. On these grounds you’ll find more graves of the sacrifices that were sent down here. There is also a bridge crossing a small river that leads to a large stone slab with text on it. Shimmering in the water to your left will be another Small Key.
Exiting this room east will lead you to another hallway where you will be chased down by a now vamped Astoria. She reveals that Alaexa had already been turned by the time she arrived and Astoria willingly joined her in undeath. She’s thirsty and looking to make you her first bite.
- Astoria
- Max HP: 1200
Astoria is very weak, even if you are under the recommended level, her attacks shouldn’t even scratch you. She’s more interested in healing her wounds and slowing you down than actually attacking you. If the battle goes on for too long, she’ll eventually run out of SP to cast her healing and focus on attacking, but by that point she should be nearly defeated. Once the battle is over, Astoria becomes mist and disappears.
Head down the hallway and into the first room on the right. In this bathing hall, merely grab the last Small Key that is in the water. The second room on the right is an indoor garden filled with corrupting fluid. If you try to walk through this purple muck you’ll become infected with vampirism! There is a chest in this room as well, but it is blocked by some thorny plants we can’t get past yet.
Return to the main room with the 4 doors so that we can begin to unlock them. Starting with the rightmost door, check the glass cabinet for a Vulnerary, then inspect the rightmost wardrobe for a Liquid Silver,the wardrobe on the right wall for a Supply Cache (S), and of course the chest that contains an Ammo Pouch. The last thing to note in this room is the bed on the left. If you decide to use the bed at any point while Astoria still lives, you will get a Bad Ending.
The door second to the right is a treasury room with 8 gold chests that are inaccessible. The red chest on the right contains 400 Gold and the chest on the left contains a Gothic Corset, a new Clothing equipment for Mila. Check the last locked door in the main room to enter a small library. There is a scrapped paper here that reads B-3, this will be important soon. There is an envelope on a desk from Alexa to Astoria you can read if you like and a statue you can inspect which has a button you can press. Press it to open a secret passageway in the room next door leading downstairs.
Return to the room with the piano and suit of armor and go down the newly unlocked passageway to enter a small wine basement with a chest containing Large Shears. You can use these shears on the thorny plants found in the garden to grab the chest containing a Torch. Now that we have the Torch and have beaten Astoria, we can go down the staircase found in the dining hall in the west section of the Blood Temple.
This room is pitch black, but once you’ve obtained the Torch, Mila will automatically light up the room. Astoria can be seen on the opposite wall walking down another flight of stairs, we should follow her. There is a locked gate immediately in front of you, but after you light the passageway, you can find a Gate Key shimmering on the floor that will unlock this gate. In this underground maze there are a few chests to collect. In the north end is a small chest containing 50 Gold, to the west is a chest containing a Supply Cache (M), a large chest to the east containing a Viribus Laurel, and finally to the south is a chest containing Holy Water. Our goal is to reach the staircase on the eastmost side, but there is another staircase leading down towards the center of this maze.
There is an eerie silence in this room. When you enter, you will find switches on both sides, labeled with a letter and a number. Take a moment to remember which panel is which before proceeding. On the north end of the room, is a dark chest containing the Vampire Corset, but be warned: once you have opened this chest, you will trigger a trap! Gas will begin to fill the room and you will have a mere 15 seconds to deactivate it before Mila will be consumed by the corrupting gas and turned into a vampire, leading to a Bad Ending. Flip the B-3 switch found in the second row on the right to deactivate the gas and unlock the gate to allow you to escape. Leave this trap room and venture through the maze leading to the rightmost side to get to the stairs that Astoria entered.
You will enter another quiet and foggy room. Save and proceed through the gate door which you can open without a key to find Astoria and her lover, Alexa. The two vampires will try and seduce Mila into joining them. If you accept their proposal, it will lead you to an extended Bad Ending where Mila will become a slave to Abelleth’s Guardian. If you deny their offer, you will have to face the two vampires at once.
- Astoria
- Max HP: 1200
- Alexa
- Max HP: 1600
The two vampires will work as a team to defeat you. Alexa is the main attacker while Astoria provides her with support, casting healing and buffs on her while casting debuffs on you. Start the battle by using Liquid Silver on Alexa to weaken her attacks and then use Cross to cause damage to both vampires. If you have Knifera, use it on Alexa and try to defeat her first since she is the main threat. Astoria will rarely attack you and her damage output is pitiful. Leaving her to fend for herself will likely spell victory for you. Either way, while both of the vampires remain alive, they may occasionally waste a turn admiring each other so use those free turns to your advantage. Defeating the two of them will drop 2x Vampire Dust and a Ruby Spinel. After the battle, you will be given the option to quickly head back upstairs if you want to skip the return trip through the maze. Keep in mind that just to the north of this room is a chest with a Silver Ore, that you may miss if you choose to quickly head back up, although you can always come back for it later if you choose.
All that is left to do is to defeat the village’s Guardian. Now that the other two vampires are gone, you can also safely rest in the bed found in the rightmost room of the 4 door room. Once you are full on HP and SP, save and return to that outdoor area with the graves and inspect the large stone slab beyond the bridge. Place the ruby spinel in it to open a passageway leading to this quest’s boss.
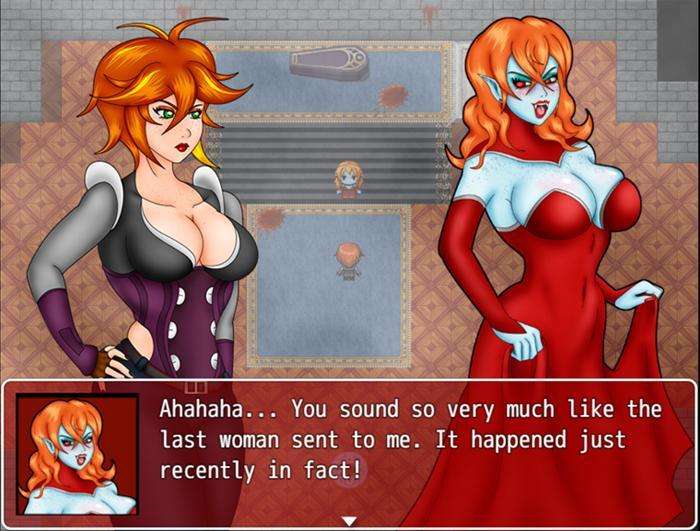
In this crypt, the village’s Guardian will reveal herself. A buxom vampire dressed in red named Victoria will greet you, expecting another tasty meal. Mila will tell Victoria that she has already destroyed Alexa, her most recent catch. Hearing this, Victoria will want to replace her with Mila instead.
- Victoria
- Max HP: 3100
Victoria has stats appropriate to a village guardian with plenty of tricks of her sleeve to make this fight challenging if you aren’t prepared. Victoria can hit hard, buff herself, and summon a swarm of bats which hit multiple times and drain HP per hit. Her bat swarm attack in particular is deadly. While Victoria still has at least 75% of her health left, she may waste turns laughing at you instead. She will only begin to cast Blood Heal when she is at 20% health or less, so use these clues to gauge how close you are to finishing the fight. She doesn’t have any other distinct weakness from other vampires you’ve faced so far. Use the usual strategy of debuffing with Liquid Silver and Daggers first then using as many skills as possible. It should be noted that her Magic Defense is a bit lower than her Physical Defense, so Fire Bomb may be a good move against Victoria, especially if you are outspeeding her. Be VERY conscious of your health during this fight. If your HP reaches 20% or less, she will automatically inflict the Wounded status on you!
If you happen to lose against Victoria, she will turn you into a Ghoul and release you into the Rotten Grove to join the other wandering undead. If you do defeat her, you will unlock Pic 32 in your Picture Gallery. Victoria will also drop a House Key onto the floor which you can pick up. Your contract is complete, but there is one last thing we need to do. If you examine the House Keys you picked up, they will have an address on them: 341 Abelleth Village Residence. Return to Abelleth Village enter the house with that address using the House Key you collected. This is Alaexa’s house and the main trinket to get here is the Silver Ore found inside the chest. You can also read through Alaexa’s diary as well to find out what she was saving the ore for.
Contract 8: The Lost Wife
- Availability: At the end of Chapter 2
- Recommended Hunter Level: 14
After accepting the contract, go to the flower shop in Mor Town Center to speak with your client. Once you have finished speaking with him, he will give you the Woods Map. With this, you’ll be able to get to a hidden area in Humilem Woods, so head there. Once you have arrived at the crossroads, you can check the map in your key items to see that you need to head North, West, and North to find Wheezie Woods.
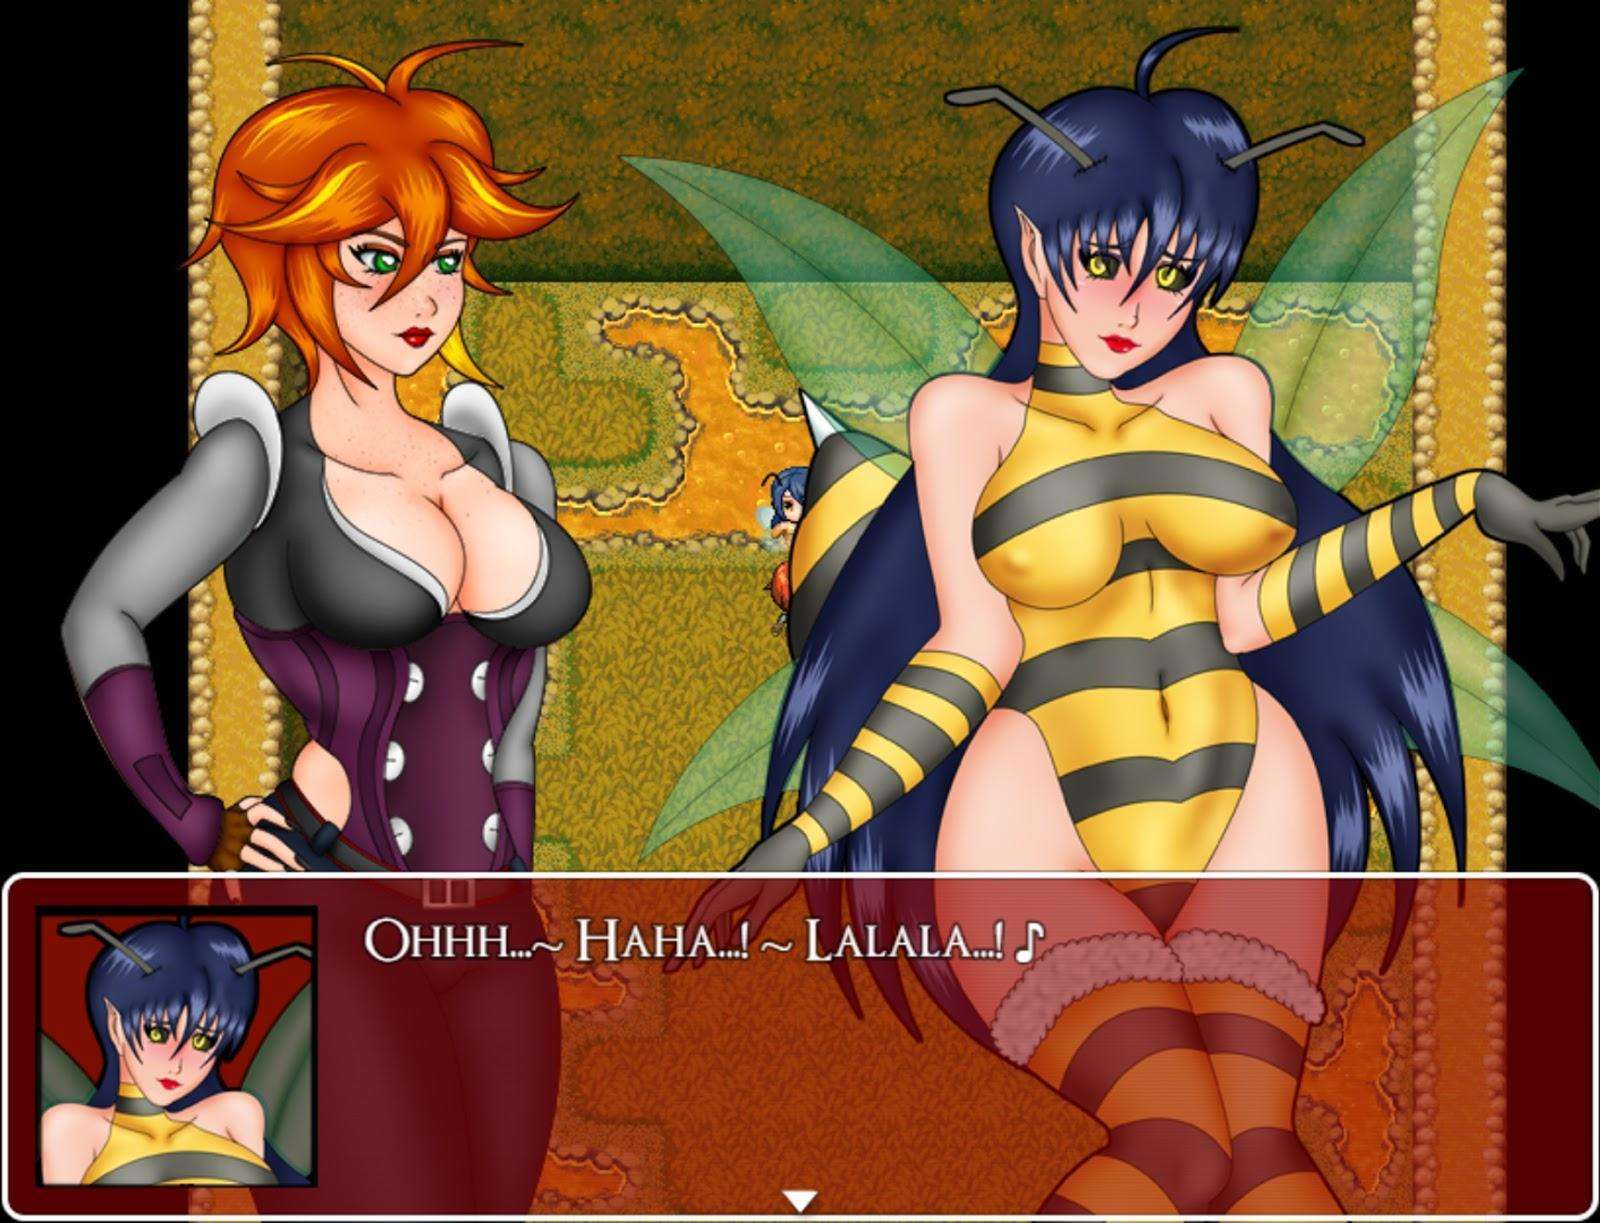
Once you’ve entered this golden forest, you’ll see the Whezzia, bee-girls who seem uninterested in speaking with you. Head North to enter their hive and at the end you will meet the Whezzia Queen, although she too is rather uninterested in speaking with you. To grab her attention, go to any pool of honey to interact with it and take some Wheezie Honey. Doing this once is enough to grab the Queen’s attention. If you do this two more times however, the whole hive will be alerted to your presence and attempt to stop you, prompting a fight with some Wheezing Workers.
While individually they are weak, the Whezzia Workers have strength in numbers and may overwhelm you if you are too low level. Defeating them may occasionally grant more Wheezie Honey and some gold as well. The Wheezie Honey can be used as a healing item, but it’s not recommended that you use any for now. If you consume at least 3, speaking to the Whezzia Queen will always result in a Bad Ending. If you did this accidentally, you’ll need to return to the client in the Mor Flower Shop. Speak with him and Mila will… expel the honey from her body.
Once you have grabbed the Queen’s attention, speak with her again. The bipolar Queen seems unstable, but you can ask her a series of questions. Select the third option and then confirm the following question to see a bad ending. Select the fourth option to find out that the Queen is actually your client’s missing wife who was turned into one of the Whezzia. After the scene a fight will commence.
- Betty
- Max HP: 2300
Betty has low HP and low Defense, although her attack is higher to compensate. At the end of the first turn, she will summon two Whezzia Workers to the fight. If you got the Gas Mask from the alraune contract, you should equip it before the fight since both Betty and the workers can make Mila Woozy. The Cross and Cross skills are pretty ineffective in this fight. While they will hit all of the enemies, they do little damage to enemies who aren’t weak to the Light attribute. The Axe and Axera skills however are very effective and will do much more damage if you manage to land them. Once Betty is at 30% Health or lower, she will summon 2 more Whezzia Workers to help her.
The Queen is defeated and the rest of her workers scatter into the forest. Return to the Mor Flower shop again to report to your client. He will leave the shop without giving you your reward, so follow him outside and speak with him again. He will give you 800 Gold for your services as well as the Striped Dress. You will also unlock Pic 41 In your Picture Gallery.
Contract 9: Suspicious Snake Oil
- Availability: At the end of Chapter 2
- Recommended Hunter Level: 15

After accepting the contract, head to Mor Town North and enter the house at the northeastern corner. Inside, you will meet your client who will explain the story of his missing wife and a shady business woman in South Mor Town. He hands you 600 Gold before you go. Once you are in South Mor Town, speak with the woman with the violet hair. She will ask if you are interested in purchasing her products. You can accept if you want, but all of her items are overpriced and pretty worthless. You’ll have a short chat, and she will invite you to her resort, which she opened recently, just outside of town. After the exchange, she will hand you a Member’s Card so that you can check the resort out for yourself. After the woman has left, leave Town and head to the resort which is just to the south.
Once you arrive at the Althaeban Resort, show the Member’s Card to the guards and they will let you pass. If you enter the southmost tent, you can find Liquid Silver inside the jar to the left. Speak with the lady with the purple hair again and enter the resort lobby. She will have you fill out some paperwork. Once that’s done, you can try and enter the men’s restroom. Although it is locked, you can continue to pester the man inside. Keep doing this multiple times and he will eventually give you an Albatraoz Oil. If you check the trash bin in the women’s restroom, you can also find Alquarf Oil. Speak with the receptionist lady to turn in the paperwork and then speak with the woman on the left side of the room and she will take you to the spa room behind the curtains.
Mila will lay comfortably on the bed and you will be prompted if you want to get dressed or stay longer. If you stay longer, you will get a Bad Ending. Get dressed and then head outside to the southmost tent where you found the Liquid Silver. There, a woman will transform into a lamia before your eyes. Another lamia will enter as well and a fight will commence.
- Newborn Lamia
- Max HP: 1300
- Lamia Servant
- Max HP: 1850
The Newborn Lamia is a very weak enemy that shouldn’t be much of an issue. She acts as more of a supporting role for the lamia servant. The main thing you should be wary of is if either of them decides to coil you, restraining you from acting for a few turns. The lamia servant can not only weaken you, but also poison you for continuous damage. Lamias are susceptible to Piercing attacks, so spam Knifera whenever you can. The Lamias will also drop Antitoxin when defeated, which removes Poison and heals a bit of health.
The newborn Lamia is actually your client’s wife. After the scene, you will receive the Resort Key. Exiting the tent you will see more Lamias who will slowly move toward you. You can fight them for some extra gold if you like. Return to the Resort Lobby and head to the back of the room where there is a door that you can unlock using the Resort Key. Head down the steps and in the last room you will find the business woman from earlier, Nefertari. She will reveal herself to be a Lamia as well and a fight will commence.
- Nefertari
- Max HP: 5300
Nefertari, like the other Lamias, is weak to piercing, so Knifera should be your go to move during this fight.Nefertari can occasionally act twice per turn, so be prepared for that. Stacking multiple status effects is how this boss can get the better of you. If you have any Antitoxin left from defeating the Lamia Servants, this is a good fight to use them. If Nefertari brings you to 20% of your health, she will try and attempt to coax you into surrendering. If you fight back, you will inflict a bit of damage on her, but if you give in, she will inject Mila with her venom, dominating you and effectively ending the fight.
Once the Lamia Queen has been defeated, a scene will play out and you will be returned to your client’s house, where he will be reunited with his lamia-fied wife. He doesn’t seem to mind however, and will give you 950 Gold as a reward. More Importantly, the client’s wife will teach you the Light Skil Dual Lashings! You will also unlock Pic 42 in the Picture Gallery.
One last thing you can pick up is a Sunlite Tea from Delum at the Resort Lobby. He’ll be sitting by the massage room after you’ve completed the quest.
Contract 10: Keeping Mindful
- Availability: At the end of Chapter 2
- Recommended Hunter Level: 17
While this contract is doable at HR 17, it is recommended you at least reach Fallholt in Chapter 3 to pick up stronger gear and skills before proceeding. The battle in this chapter will be challenging without proper preparation! Anyway, after accepting the contract, head to the small town of Ilbrooke which can be found in the southwest side of the Eastern Overworld. Upon arriving, there will be a cutscene where you will meet a mysterious woman in black. You’ll notice that the town is covered in a strange fog, yet this odd woman pays it no mind. During the conversation another young woman will bump into the two of you and then run away while dropping something onto the floor. The woman in black then invites you to follow her into the Ilbrooke Caves to the north end of town. Following the woman will result in a Bad Ending. Deny her proposal and the woman will leave and Mila will pick up the Ilbrooke Shack Key that was dropped on the floor.
Exploring the town, you’ll notice that most of its residents are nowhere to be seen. All the buildings are locked and the only people outside are three women acting incredibly strange. The northernmost building has one woman who is not acting odd and it’s the woman who bumped into you earlier. Speak with her and hand her the Ilbrooke Shack Key that you picked up earlier then follow her inside of the shack.
It should be noted that you can also explore the caves to the north, but exploring too deep right now will result in a bad ending. Speaking to the woman in black outside of the caves will also have the option to give you a bad ending.
Speak to the woman again to find that she is your client, Melody. She explains that her town is being preyed on by an Hirnlienne, a brain-draining monster that leaves it’s victims as debauched shadows of their former selves. Under normal circumstances, you would have no hope to fight against this mesmerizing enemy. However, Melody provides you with a Tin Foil Hat. This headgear has pitiful stats, but it will be necessary to equip if you are to stand any chance against the Hirnlienne. Do so before going on any further. Once you have received your shiny nice headgear, check the barrels to collect 200 Gold and a Salutem Laurel. You are now ready to explore those caves to the north, so let’s head there.
Starting off, there are 3 entrances to the cave which lead to different areas. The cave itself is dark and contains Ghouls to fight against. You’ll also notice that there are holes strewn about the cave which you cannot pass. Throughout the cave are chests which contain “Sturdy Board”. You can use this item over any hole to cross them. There are a total of 3 levels in the Ilbrooke caves and your target is on the third. Follow the maps below if you need help navigating the maze.
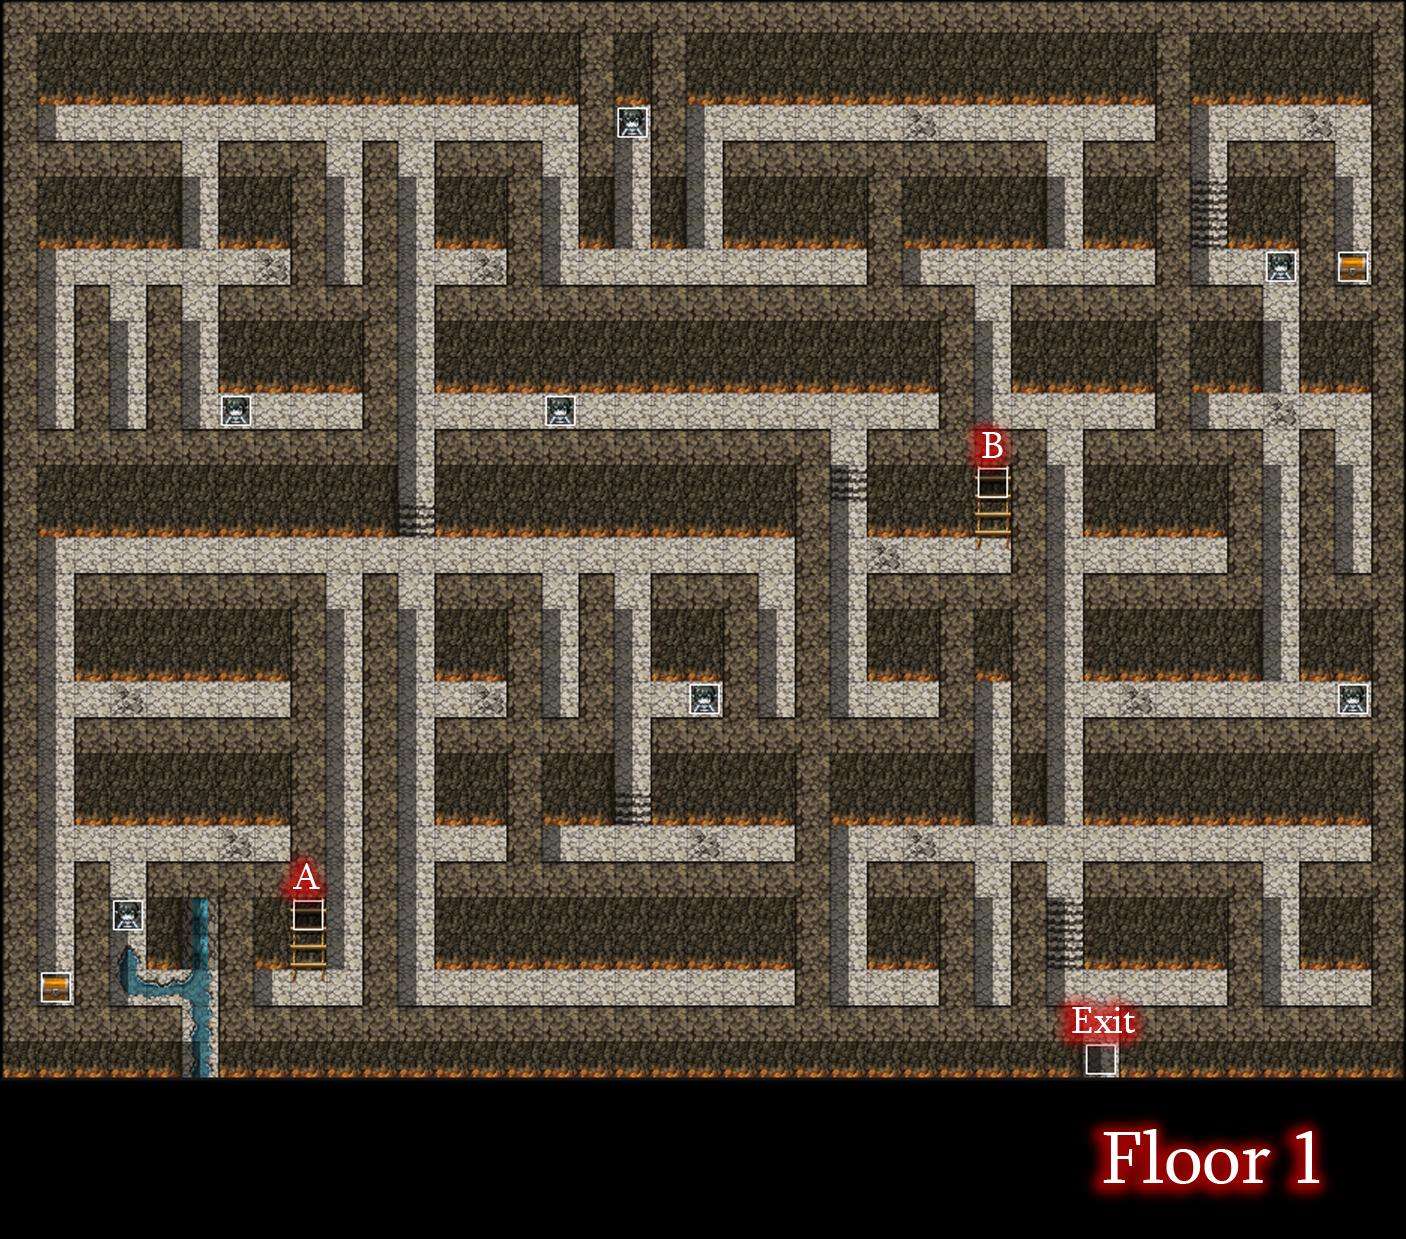
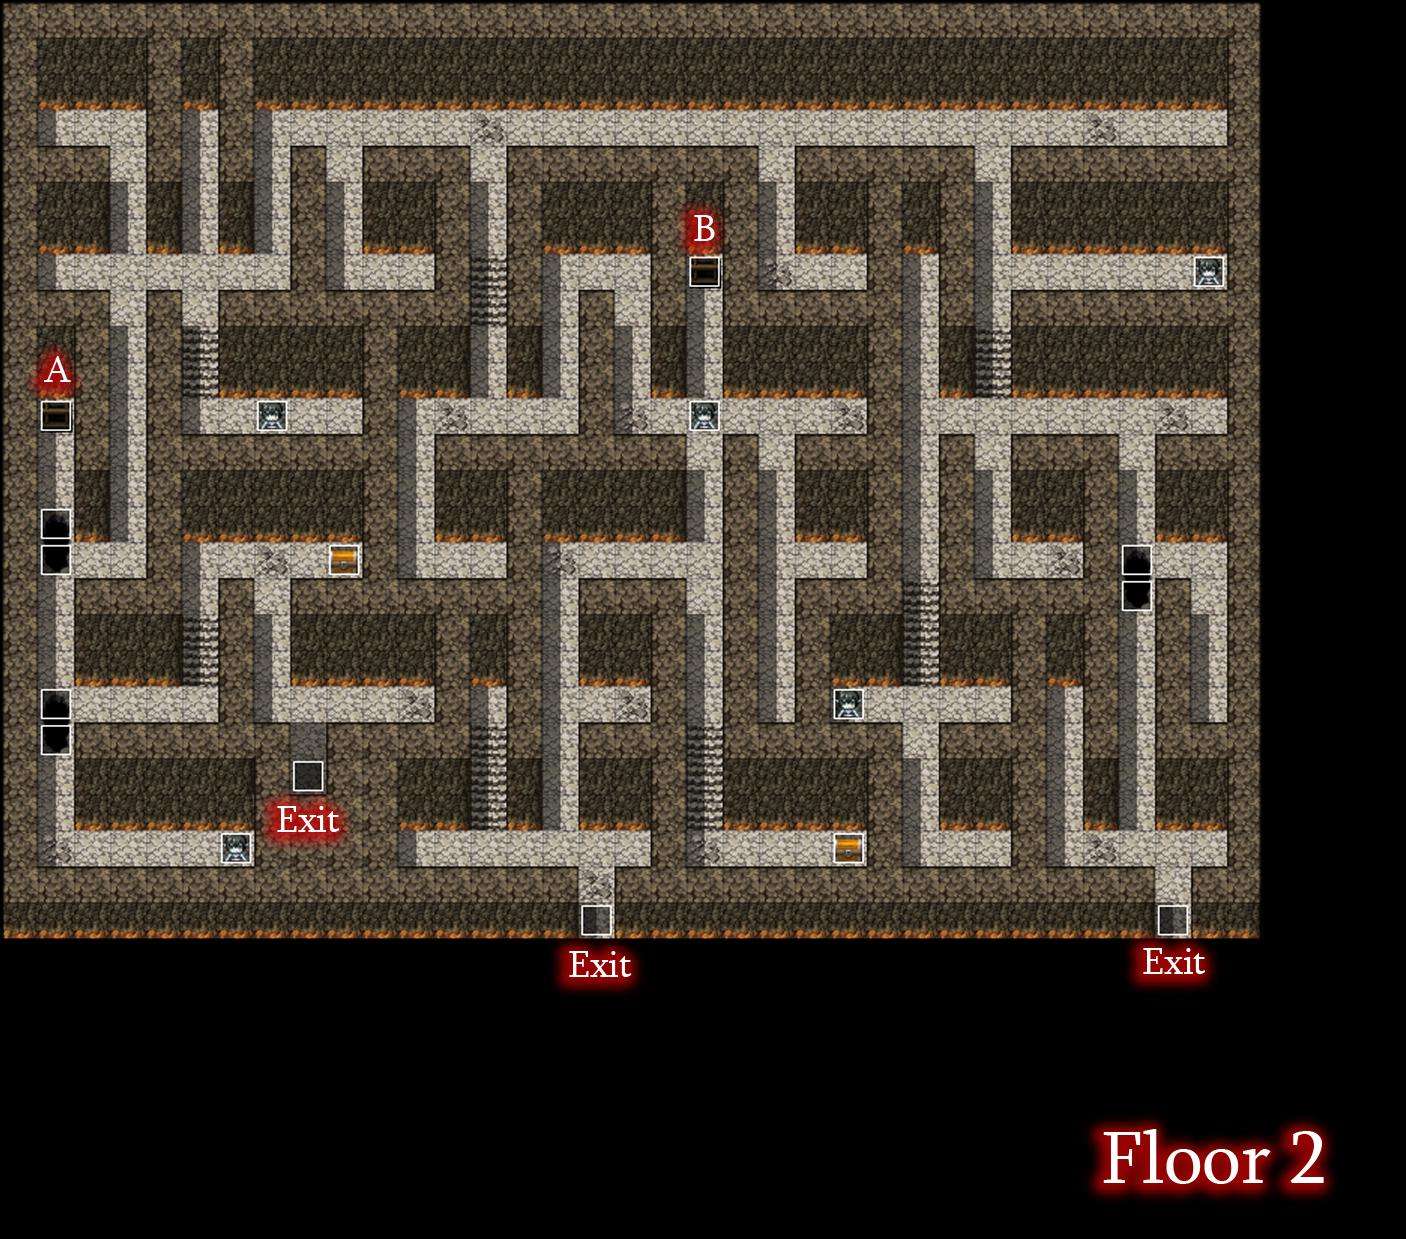
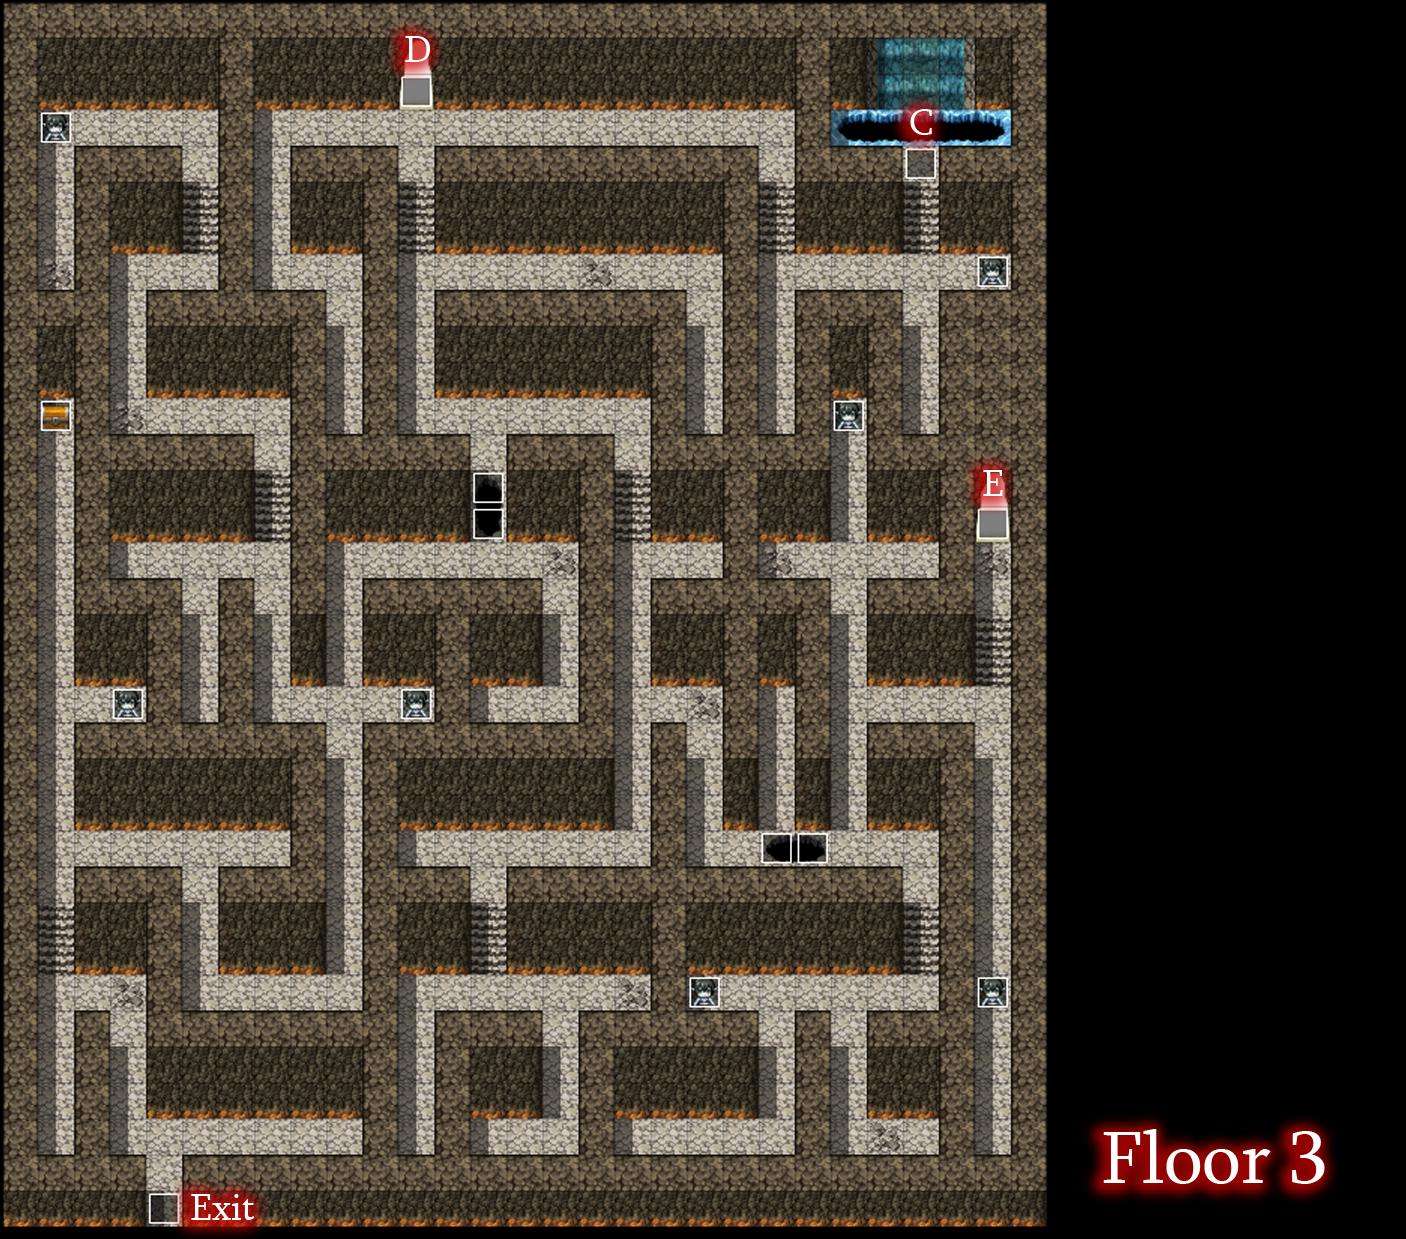
Before entering the cave that leads to floor 3, take a moment to roll the boulder down the hill to unlock a shortcut that will be useful soon. Once you have reached the third floor, you will need to go down the hole at point C to find the last Sturdy Board to cover the holes. After picking this up, you’ll be back at the first floor, but you can use that shortcut we opened up earlier to get right back up to floor 3. If you go through the entrance at point D, there will be a small section with 4 ghouls and a chest containing Silver Ore! Once you are ready to tackle the boss, head back to floor 3 and enter point E. Be absolutely sure you have your Tin Foil Hat equipped or it will result in an automatic loss!
- Lillith
- Max HP: 7200
The woman in black turned out to be the Hirnlienne all along! Many of her attacks are magical which means that you likely will not have the defense necessary to take minimal damage. High HP and stat boosting foods are recommended. Lilith has a 75% chance to take two actions each turn and she is rather fast. Plan each turn assuming that she will attack twice. Her physical attack isn’t very high, but she is capable of using Claw Swipe to cause continuous bleeding damage, and her Lewd Slime attack can lower your physical defense as well. Her nastiest attacks are the ones she is most likely to use often. Her Brain Drain skill recovers her health slightly while reducing your agility and her Brain Waves skill hits multiple times and reduces your magical resistance. If you completed the Casino Side Quest, the skill you earn from it will be invaluable in not only healing you, but also getting a lot of damage early on.
Once you’ve vanquished the goth mind sucker, you’ll automatically be returned to Melody. She will reward you with your pay of 2750 Gold and she will also comment on the item you picked up after defeating Lillith. With your newly obtained Mind’s Eye you will be able to check enemy weakness, resistances, and total HP! In addition an HP gauge is displayed for the remainder of the battle! With your contract complete, you will unlock Pic 64 and 65 in the Picture Gallery. Additionally an NPC named Chris will appear in the village after you’ve cleared the quest and he will give you a Celeritas Laurel for chatting with him.
Contract 11: Beneath the Full Moon
- Availability: At the end of Chapter 3
- Recommended Hunter Level: 19
Head to the Fallholt Tavern and speak to the red haired guard sitting alone at the table. This is Quinn, a guard lacking a bit of self-confidence. She tasks you with helping her on an investigation regarding missing people. The outcome of this quest will change based on the way you answer questions throughout this quest, similar to the Succubus Quest from earlier. If you answer questions negatively, Quinn will end up as Lycanthrope herself and you will be forced to fight against her. This guide will show you the positive answers to keep her as a human, but feel free to go against it if you would like to see the other outcome.
Keep in mind that once you speak with Quinn, you will not be allowed to leave her side until you are done with the quest.
In the first conversation with her, answer “You’re on to something”. Quinn will then join your party and you must head to the western side of the city to question some of the townspeople. To the man, answer “Intervene”, for the old woman answer “Disregard her Comment”, for the man by the snow, your answer changes nothing. After speaking to the 3 people, head to the Fallholt Cathedral and speak with the church worker there. Afterwards, go outside for another scene and answer “Don’t say that”. Then, search the floor near the church to find the final clue to Quinn’s investigation, a tuft of bloody fur. Head to Fenrir Glade to track down your suspect.
Once you are in the area, your way to the village will be blocked by Lycanthrope Guards. You will have to defeat them to get past them and Quinn is there to assist you a bit. Once they are out of the way, the Lycanthropes of the village will mob you. Either avoid them or take them all out, but your goal is the Queen’s home to the north of the village. You’ll once again have to fight against two more of her guards and once they are defeated, you have one last chance to heal up and save before going through a couple of scenes, culminating in two back-to-back battles in Fallholt.
- Lycanthrope Elite/Quinn
- Max HP: 3000
Both of these enemies are slightly stronger versions of the standard Lycanthrope enemy you have faced up until now. The strategy of this fight is the same no matter what. Both enemies have the same stat line. Focus on conserving your SP as much as you are able because unlike your HP, your SP will not be restored in the subsequent fight.
- Sophia
- Max HP: 8000
Sophia has high attack and speed, befitting a werewolf queen. Daggera is recommended to have in this fight and you’ll have a tough time against her without it. She attacks twice per turn and occasionally uses a skill which allows her to strike 3 times. This can be devastating if she uses it twice in a row, although this is unlikely. If you earned the Aeriseth Summon from an earlier quest, you will have another useful tool to combat her.
Completing this grueling fight, you will be transported back to the Queen’s home. Speak to Quinn one last time to complete the quest, earning you the Daggerga skill as well as Pic 81 in the Picture Gallery. Once you have cleared this quest, you can also speak to some NPCs for some goodies. If you go to Fenrir Lake, speak with the NPC Peranut on the northwest corner to receive a Salutem Laurel. Then, you can go to the Port of Fallholt.There you can find a lycanthrope with silver hair named Erin who will give you a Silver Ore for speaking to her.
Contract 12: The Tragic Bride
- Availability: At the end of Chapter 3
- Recommended Hunter Level: 20
This quest is relatively straight-forward, though it does have multiple endings. Your client Konrad will be waiting inside of Fallholt Cathedral. Speak to him and he will brief you on his Client, Jessica. You may have seen this character at multiple points during the adventure (It’s even possible to fight her early during the events of Chapter 3). She is a vampire, but like princess Anja, her mind has been returned to her after a chance encounter. After speaking with Konrad, you’ll have to visit Jessica at her home in the residential district of Fallholt, Residence A-3. She’ll give you her backstory and afterwards you are free to walk around her home. Something to note is that there is a pot on the second floor of her home that contains a Moonlite Tea. Be sure to grab it before returning to Konrad.
Speak with Konrad again and he will start preparing a meet up between Jessica and some suitors. Finally, return to Jessica one last time and once you are ready for a fight, agree to go with her to the meet up. During the scene at the cathedral, there are multiple opportunities to get a different ending. Jessica confesses her love to Mila and you can accept it to earn one ending. Deny her to proceed to the boss battle.
- Jessica
- Max HP: 6000
Due to being inside of the cathedral, Jessica’s health is constantly ticking down. This fight isn’t particularly difficult, but it can be a bit annoying if you don’t understand how it works. Jessica’s primary move mesmerizes MIla, which will prevent you from taking any actions for a few turns. Combined with her ability to wound Mila with continuous damage, you can find yourself losing a lot of HP without realizing it. The trick is that her mesmerizing move almost always goes first. Slower moves like Axe, bomb, or any of the buffing skills will be canceled out of she decides you use this. Your best bet is to attack her with either the knife or dagger skills, since those have priority in battle. After a few rounds, Jessica should go down. Losing this battle will result in a slightly altered bad ending from the last mentioned one.
Once Jessica is beaten, you have the option of slaying her or sparing her. Whatever you decide to do, you will unlock the Crossga skill as well as Pic 99 in the Picture Gallery. If you spare Jessica, you can then visit her at her home whenever you like for a few optional conversations!
Contract 13: The Forgotten Treasure
- Availability: At the end of Chapter 3
- Recommended Hunter Level: 22
It is recommended that you obtain the “Skeleton Lexicon” from chapter 4 before accepting this quest.
Oh boy! A treasure hunting expedition! I’m sure nothing could possibly go wrong!
Meet with your client, Rita, at the Port of Mor. She’ll give you a run down of the adventure you two will go on and will also mention to stock up before heading out to your destination since items are pricier in the desert town of Kedje. It would be wise to purchase several Supply Caches for the following quest just in case. You should also be carrying at least 500 Gold with you before you go. Once you are ready, get on the ship and sail to the Port of Kedje.
Once you’ve arrived at the port and read through the short scenes there, check the pot right by the port’s exit to get a free Garnet Shard. You won’t be able to explore the desert without Rita, so head into the nearby town of Kedje. There are two shops and a restaurant here. A store of note is the accessory stand with unique accessories you may find useful. If you are attempting this quest below the recommended level, you may want to pick up the Blaze Earrings. These will enhance the damage of your bomb skills, which is key to clearing this section efficiently.
You can speak with the locals for some lore and also warnings about Asenath’s tomb as well as her cursed guardians! Next to the restaurant is a vase containing 15 Gold. Inside the leftmost tent, check the barrels for: A Vulnerary, 20 Gold, and 80 Gold. You can also speak with Don here who will hand you a Felix Laurel. The rightmost tent has a couple of restaurant workers on break and you can find 100 Gold inside one of the barrels. Finally, inside the restaurant proper, you can order some food items for health and stat boosts if you like. Speaking with a silent man over and over again will reward you with a Ham & Cheese Sandwich.
Rita doesn’t know the direction to Asenath’s Tomb, so pick up the Tartuset Desert Map from the item stand of the west side for 500 gold.With the map in hand, speak with Rita again and you will be sent back to the field map. The tomb is far to the northwest. If you decide to explore the desert instead, you can find items hidden in the sand. There is a faint glow and examining it will reward you with the item. There are six items to get it total: A Praesidio Laurel to the south, Jade to the southwest, a Felix Laurel around the center of the desert leaning west, a Garnet to the East, a Diamond Shard to the north near the border of the desert, and finally another Jade in the northeast corner.
Arriving at the Pyramid will result in another cutscene. Follow Rita inside and help her move the structure to move further into the tomb. The next door will be locked, but by moving the nearby stone onto the switch, you can unlock it. Follow Rita into the chamber and then over to the large sphinx at the top of the room for another cutscene. You’ll be separated from Rita and she falls to the room below. The way out is shut, so you’ll have to rely on what you’ve got on you to get through this dungeon.
Start exploring Asenath’s Tomb beginning with this room. There is a Supply Cache (s), and 25 Gold found inside of some vases. Proceed to the west hallway.and go down the stairs. From the bottom of the staircase, ignore the south door and continue west.

In this room you will have your first encounter with the Cursed Guardians. These mummies have high physical defense, but can be defeated easily with Bomb skills. They can also drain your health and inflict the Cursed state on Mila. While cursed, Your agility is drained and you will lose a small amount of SP and LP each turn. It can be detrimental in this dungeon if you don’t have a way to recover SP. Being cursed also slows you down outside of battle and you also cannot open chests while cursed. This will be relevant in an upcoming room.
Explore this west hall to collect a Salutem Laurel from a chest and a Supply Cache (s) in a vase. There is room that leads north, but you should ignore it. Inside is a trap which will toss you into a room filled with cursed guardians. You’ll have to defeat all of them to escape, which will put a dent in your resources. Continue east to find a similar room. This time there is a switch that you can press which causes a statue to move out of the way of another room’s entrance. This room is the queen’s treasure room, however, it is protected by a fog that will curse Mila as soon as she enters. If she remains in the room for more than 30 seconds, it will lead to a bad ending. We will need to double back to this room once the boss is taken care of. The last thing of note in this room is a chest containing a Medicinal Herb. Continue through the lower east exit. The other exit leads to a dead end. In this connecting hall there is an unmissable chest with a Praesidio Laurel in it and the other side leads to the east hall, connecting several important rooms.
Grab the Supply Cache (M) in the chest then go to the room to the northwest. It leads to a bath, which is the room where Rita fell down to, though she is nowhere to be seen. The door ahead is locked and the way to open it is by getting two keys that can be placed in the large crystals to the side of the door. Grab the Supply Cache (L) and Jade Shard from the vase then exit and make your way to the room next door. In this curious room, there are several switches, each marked with a roman numeral. What you want to do is press switches that add up to exactly 7 to unlock the vial at the center of the room. Getting the answer wrong will place a movable boulder in front of the room’s exit and the room will be filled with cursed fog. Failing to escape in the allotted time will result in a bad end. If you mess up along the way, press the 0 switch to reset the puzzle. Complete the puzzle to grab the Red Elixir.
From the last hallway, enter the eastmost room to find a large sphinx statue, two sarcophaguses, and three movable boulders. Once you approach the boulders, the door will close behind you and cursed guardians will emerge from their rest to try and get at you. All that you have to do here is move two of the boulders onto the two switches to unlock the door and obtain the Turquoise Tablet from the sphinx. This is one of the keys needed to unlock the door in the bath.
For the last key, double back to the western stairwell. For an extra treasure, go there via the east stairwell to pick up a Ruby Shard inside of a chest. Once there, go through the southern exit. You’ll find a long claustrophobic corridor that leads to a statue. Pick up the Medicinal Herb and Vulnerary from the vases if you like and then use the Red Elixir when prompted and you will receive the Olivine Octagon. With both of these keys in hand, return to the bath and place the keys inside of the crystals. Heal up and be ready for a few fights.
Once you go through the chamber, you will be face to face with Asenath herself. She will try and mesmerize Mila and submitting to her will result in a bad ending. If you resist, she will summon more of her guardians to deal with you, Rita among them.
- Mummy Horde
- Max HP: 900 x 3
This fight isn’t tackled much differently than regular cursed guardians. In fact, they actually have less health than the ones you’ve fought individually. Use either cross or bomb skills, but don’t go too crzy using SP as there is another fight right after this.
- Asenath
- Max HP: 10,500
Asenath’s gimmick is swapping between her undead and human forms. The only time you can do significant damage to her is while she is in her undead form. She will swap between them every four turns so use that knowledge to your advantage. Use the time where you can’t attack to heal or use buffs. Like the cursed guardians, Asenath is capable of draining HP as well as inflicting the curse state. Magna Flash is also effective, if you have it. This fight may take a little while, but you should have no issue as long as you remain patient and keep your HP high. Defeating Asenath will land you with Asenath’s Diadem as well as Pic 100 in the Picture Gallery! This headgear prevents curses, so go ahead and equip it to grab the real prize of this quest, the queen’s treasure! All of the cursed guardians will disappear after Asenath’s defeat, so it should be an easy sprint over to the treasure room. Here you will find six regular chests plus one gold chest! Inside the regular chests are one Silver Ore, a Sacred Elixir, 8000 Gold, Illustrious Garments, Ancient Royal Plate, and Pharaoh’s Heels! Take note that the armor found in these chests are permanently cursed, so you will need to equip Asenath’s Diadem to wear them without the drawbacks. If you did pick up the Skeleton Lexicon from Chapter 4 before taking on this quest, go ahead and unlock the gold chest to unlock the Axera skill!


Be the first to comment